Paper

Paper is a new sketch and note taking iPad app from FiftyThree. Considering the iPad is two years old it’s a later addition to an already saturated market so whats marks out Paper when compared to the other sketch tools? Simplicity.

Paper is free and is well worth downloading. You can have a number of sketch books, the only customisation option being the name and cover photo of the book. Touch on a book to open the book in a coverflow view of the pages. Swipe through the pages and when you reach a page you want to edit touch on it. You will be presented with a blank page. No lines, no toolbars. Just one default tool that allows you to draw on the page. Swipe up from the bottom of the screen to open the tool tray which allows you to select from one of 5 tools and only 9 colours.

Although the app is free it only comes with one tool – Draw. To use the other tools which are Sketch, Outline, Write and Colour you need to buy them individually or buy them all for a slightly reduced price (around £5 from memory). Initially I thought that was slightly rude but it’s a great model that I’m surprised more tools don’t adopt. One really nice feature is a 20 step undo/redo. Place two fingers on the screen and rotate anti-clockwise to step through recent changes and undo them, rotate clockwise to reinstate them. Simple and effective. You also have access to an erase tool but thats it – a very clean environment that leaves you free to concentrate on your notes rather than how to use the tool. The video below from FiftyThree highlights the key features.

It’s easy to add a new page within a book and to move back to the home screen, select a new book and cary on sketching. Paper has limited but very clever sharing features. You can share a sketch on Tumblr, Facebook and Twittter or send via e-mail. I was surprised by how limited the options seemed to be – no way to save to image folder for example but you can just take a screenshot and share that way.

The reason it’s clever is how the images are shared, take Twitter for example.

By adding the hashtag #MadeWithPaper it’s easy to click and view the thousands of sketches that are being shared on Twitter and hence generating a lot of buzz about the app. Paper is easier to use with a stylus (sorry Steve!) but it helps if you have a bit of talent.

These are two sketches from Shak, one of the founders of DigitalOutbox, who also has some skills…unlike me.

It’s all positive so far but there are some negatives to be aware of. Firstly there are no brush sizes at all so it can feel a bit clumsy and imprecise especially with the colour tool. There’s also no zoom or layer support so when you look at something like SketchBook Pro which costs £2.99 it can seem expensive. Yes – I’ve just criticised a free app for being expensive.

So why is Paper a pick? The simplicity helps you focus on content rather than the application, and the tools that come with Paper feel right. I’ve created a few screen mock ups in Paper and they look so much better than what I’ve managed so far in the other sketch tools. If you’ve got an iPad Paper is well worth trying, especially if you’ve one of those lovely new retina iPad’s. Happy sketching.

Moom

OS X is perfect. Honest.

I’m joking of course but until Windows 7 came along there was a perceived wisdom that OS X windows management was pretty untouchable and need little or no improvement. In fact I might have mentioned once or twice my love of Expose and how it made using a Mac wonderful compared to Windows. While true, Microsoft really stepped up with Windows 7 and introduced some brand new ways of managing windows particularly around their size and position.

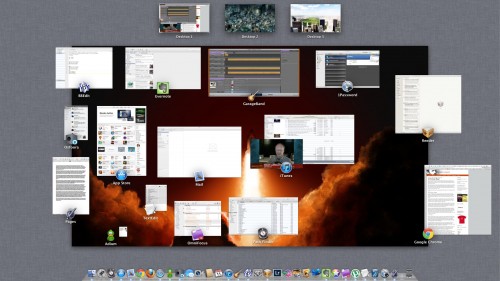
Mission Control on the Mac - nice but can be improved

Windows 7 release spawned a number of window management utilities for the Mac. It was hard to keep up with what each tool did and which one actually offered the best features but after a few months of trying various options I’ve settled on Moom from Many Tricks. Moom, so named for those that move and zoom a lot is a $5 app that add’s a lot of functionality. Once installed Moom offers a variety of window management options and one new feature in particular which is very handy.

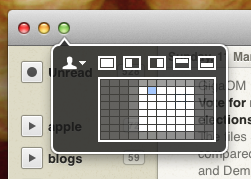
You access Moom via the keyboard or more commonly by hovering over the green zoom button at the top left of any windows on OS X. Out of the box you can select one of the icons at the top of the Moom window to easily fill the current window to full screen or the top/bottom half of the screen or the left/right half. Most of the time though you want slightly more control. In the grid below the four screen icons you can draw a window size and when you let the mouse go the current window will not only size to what you have just drawn but also pop to that position on the screen. This makes it really easy to deal with lot’s of windows that you want to size quickly.

Drawing the window size in Moom

Dragging the half width/height icons a few pixels—instead of clicking allows you to size windows to quarter size instead of half. While I don’t have a second monitor, Moom also supports easy movement to a second or third monitor while also moving and sizing the window. However you can customise Moom so that your own sizing options are displayed.

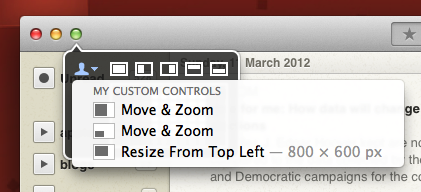
Moom's custom controls

You can setup common window sizes and these can be called up via the custom control dropdown as in the above screenshot or via a custom keyboard shortcut. This really gives you easy window management but one new feature added recently is Window Layouts. You organise your window size and positions and save that layout in Moom. Then when you have the applications opened you can easily select the layout and Moom will organise and resize the windows as per your saved layout. I find this really handy for image editing and also for recording the podcast – so easy to get the same repeated window layout quickly without faffing around sizing individual windows. Take a look at this video for a quick demonstration.

So thats Moom. For $5 it’s a bargain. One thing to note is that it’s available on both the Mac App store and from Many Tricks direct. I chose to purchase directly rather than App Store as I’m unsure on the sandboxing proposals from Apple as I can see it restricting app’s like Moom in the future. I might be wrong, but thought it worth mentioning. If you use a lot of app’s day to day on your Mac I really do recommend Moom – it makes managing windows a lot easier.

Matter

Long form journalism is becoming a hot topic. It’s becoming rare, especially in the tech and science industry to see proper long form investigative journalism and thats where Matter steps in. Launched by Jim Giles and Bobbie Johnson, Matter hopes to produce one long form investigative story per week for a small fee, estimated at $0.99 per story. It’s planned to be available on the web, phone, tablet, kindle – everywhere by the looks of the info available so far.

If that sounds vague, it’s because Matter doesn’t yet exist. It’s yet another Kickstarter project. Watch the Matter team’s launch video for a lot more info.

The great news is that within 36 hours of launching the team had raised their target of $50,000. As I write they are almost at $75,000. There are a number of funding options and if like me you enjoy proper tech journalism then I’d encourage you to support the Matter team.

I’m already looking forward to the coming months and enjoying Matter. In the meantime try out Longreads for lots of great articles to read in Instapaper, Read It Later or the upcoming Readability app.

Clear

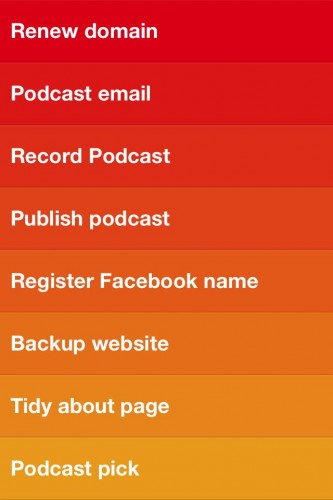
Clear for iPhone is a brand new todo manager launched last week by Realmac software. Now you may be thinking that anyone launching a todo manager is a bit late to the market. There is a vast amount of choice when it comes to todo managers, from todo.txt through to OmniFocus with Remember the Milk sitting in the middle of the complexity scale. What makes Clear stand out?

First off is the design. It take’s a brand new approach to interface design which is saying something when you consider that app’s have been available on iOS for around four years now. The bold approach taken in Clear, which will undoubtedly be copied by others is that there are no buttons. Anywhere. Everything is controlled via swipe, touch and pinch movements.

Create a top level list and then touch to enter it. Pinch out to add a new todo. Pinch out again to enter another. There are no start dates, due dates, contexts – none of that muck. It’s a simple list. To change priority touch and hold, then move up or down in the list. The colour and order is the priority. Swipe to complete, pinch in to collapse to the top list. Pinch in again and you get some very simple options. Realmac’s video is a great demo of the app.

Clear for iPhone – Available Now! from Realmac Software on Vimeo.

While the interface looks great a special shout out for the sound as well. When you complete a number of tasks it sounds like you’ve picked up some coins in Super Mario – it’s lovely, like a small reward for completing your tasks. I almost forgot – I love the icon. Stands out clearly from other icons making it easy to find in a crowded screen or folder.

There is no support for iPad or backing up to iCloud but I’ve no doubt given the success of the app (it hit No 1 app in both the US and UK) that we will see a number of features added over time. I don’t expect to see the app gain in complexity though. What makes it so useful is speed of entry and the lack of any extra attributes keeps the interface simple, quick and easy to use.

For £0.69 it’s a bargain if your looking for a (very) simple list/todo manager. It’s also a must buy if your in any way interested in app or UI design. It makes the rather dry subject of todo management almost a delight.

Tweetbot for iPad

My pick this week is Tweetbot for iPad and is another entry in the NATC (Not Another Twitter Client) category that I’ve become obsessed with since the first iPhone came out. Tweetbot on the iPhone has been my Twitter client of choice since it came out last year. I like it’s looks, speed but most importantly it’s features are second to none. It was one of the first iPhone clients to support Tweet Marker and I found it far more usable than the official Twitter client. It’s only negative was the lack of iPad support which has now been fixed with this release.

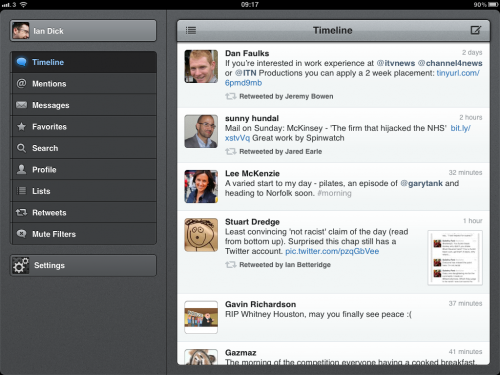
Tweetbot displays a clean view of your timeline, now including inline images

The main difference from the official Twitter for iPad client is that everything can be seen clearly on screen at the same time. No swiping, no confusion, just a clean display of tweets with inline photo’s and excellent gesture support. Swipe on a tweet to show replies or the conversation. Select a tweet and easily quote, retweet etc. Very easy to switch between multiple profiles too – click on the profile top left and switch to another. That’s all well and good in landscape but what about portrait?

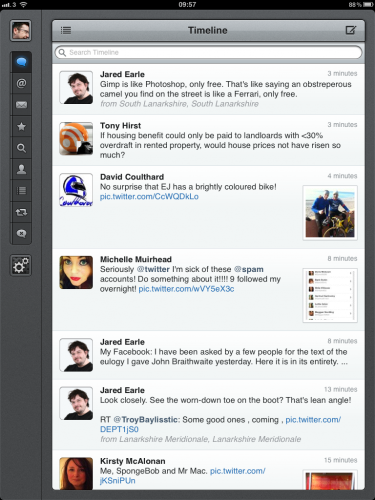
Menu's shortened but still displayed in portrait view

The menu’s are shortened to just icons and all the functionality is maintained. Some other notable features in this release include a really good in app browser. Web pages can easily be shown in a clean format via the Readbility/Instapaper switch. Flick the switch and the article is re-rendered in a clean readable format.

A web page displayed via the in app browser
The same page cleaned up by Readability - makes even the Daily Mail readable.

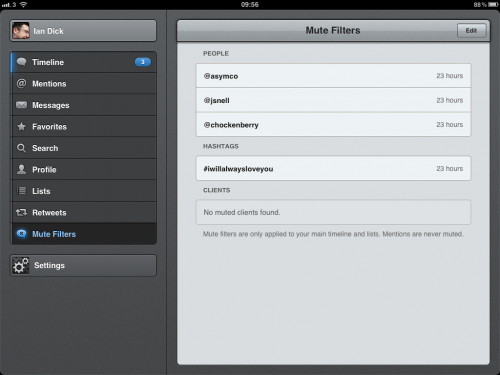
A problem with Twitter is noise. You follow a lot of people and it’s just about manageable but then an event takes place – an Apple launch or a celeb does something naughty and everyone talks about it. Repeatedly. Sharing the same content. It can be annoying but you don’t want to unfollow someone for a one day rant. Tweetbot allows you to mute users, hashtags and also other clients so you have finer control over what you want to see. It’s a great way of hiding spoileriffic content like football or F1 results if you aren’t watching live.

Tweetbot has extensive support for muting people, hashtags and clients

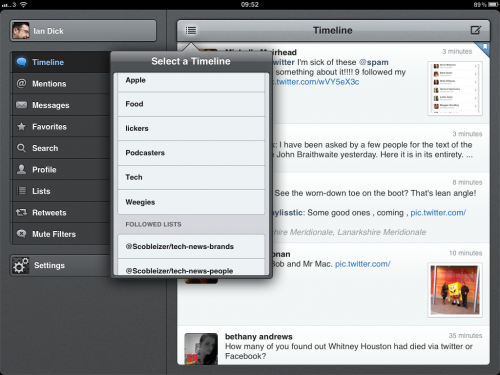
Another way of controlling what you see is to make use of lists. It takes a bit of effort but by creating a list in Twitter (or via Tweetbot) you can then filter tweets from a particular list. You can also subscribe to other public lists so instead of following lots of users you can subscribe to someone else’s public twitter list and then view the tweets from that list. I don’t make use of the subscribe feature enough but Tweetbot allows you to easily switch the timeline to a list that you have created or subscribed too. Very handy during an Apple event for example.

Easily change the timeline to your own or subscribed list

There are lot’s of other features too – notification support (per Twitter account), large photo display with the other screen UI darkened (really makes photo’s pop), the interface can be customised to remove features you don’t use, customise the triple tap to your need, change the display to show larger text or a different date format and lot’s of flexibility around services (URL, image, video, read later, sync and mobilizer) and finally customise your trend results. Quite a list and those settings are all per account so you can tweak Tweetbot to your heart’s content.

Something I have to point out is that Tweetbot is not a universal app. The iPhone app costs £1.99 and the iPad app costs £1.99. I think this is cheap for the functionality that it delivers. If you disagree then stick with the free official Twitter client but please don’t moan and post that this sucks. I can’t believe that people think £1.99 is a lot to pay and that paying for an app once means free upgrades for life and on multiple clients. We’re doomed.

Let’s not end on a negative though. Tweetbot for iPad is a feature rich Twitter client for the iPad that is easy and fun to use. Nothing else comes close and for me it’s a bargain at £1.99. Buy it!

Showyou

With so many video sources it can be hard to keep on top of whats available. SO many sites nave been setup focussing just on video, never mind your friends recommending videos in Twitter and Facebook. Thats where Showyou steps in. It brings together video from a variety of sources and presents them via one app, like Instapaper for video.

Version three of the app has just been launched for iOS devices and it’s quite a step forward. The video streams are now presented via a series of channels and grids. Swipe left to right to move between channels and up and down through grids of videos. Touch one to play and if you like share. The developers have put together a video that shows you the app in use.

Introducing Showyou 3.0 for the iPad from Showyou on Vimeo.

You can add video’s to a watch later queue and the app does a great job in bringing together videos from your Twitter and Facebook streams. It also has recommended videos sorted into channels. This reminds me of Flipboard channels and is a good way of searching through popular video’s. You can also add video’s from a browser via a bookmarklet.

As well as channels, Showyou also lists content from many viral aggregators like Devour. It’s a great way to browse and view content rather than visiting the website on the iPad.

A service similar to Showyou is Squrl which also went through a recent round of upgrades but I prefer the user interface in Showyou and find the app less buggy. Well worth downloading (for free) especially on an iPad.

f.lux

F.lux is an app for Windows, Mac and Linux that does a simple but important task – it help’s your eyes. Many modern displays are bright but you don’t really notice how bright they are during the day partly as they’ve been designed to operate well in those brighter conditions. At night it’s a different story and the brightness can really strain your eye’s if your not careful.

The shot above is from my current Mac desktop. It’s fine during the day but the whites at night even with lights on are bright. This is where f.lux helps. It sits quietly in the background and will set the colour temperature of your screen to match your lights. It detects your location and will automatically switch to the new colour temperature at the right time.

At first it feels strange when you see the colour temperature changing but I find it really eases the strain on my eyes although I will admit it does look odd when you see the screenshot above of f.lux in aciton. You can easily switch to different temperatures to match your environment and I also set f.lux to dim gradually over an hour. Makes a big difference to the effectiveness in my opinion. Finally there is an option to temporarily disable f.lux to allow you to work on any graphics or photography too.

A handy free utility that isn’t new but will be a must install on any future computers I own.

Google Personal Blocklist

A common complaint when using Google or Bing is that search results are becoming increasing less reliable. Spam sites and content farms are scraping content from original sites and using SEO techniques to ensure their sites are being returned by Google, sometimes higher in the results page than the actual original content. It’s also frustrating when searching for anew product like a TV or tech gadget and finding spam sites returning ahead of the actual manufacturers pages.

To help combat this Google is adjusting it’s algorithms but has also released an extension for Chrome called Personal Blocklist.

Once installed the Blocklist is accessed via your Chrome toolbar via the icon highlighted above. This will show you the sites that you’ve blocked, and allow you to edit the URL or unblock a site. Blocking only takes place via Google search results. The extension adds a ‘block domain’ link to each search result.

Click on the link and the site will be added to your blocklist and results will be removed from your search results.

Personal Blocklist is a very simple but powerful way to filter out the noise in Google searches. At the moment Google will not include user’s blocklists as a weighting in it’s own algorithms but surely over time this will be a great way for them to improve the quality of results for everyone? I expect if they do start to use the findings we’ll see some legal action take place. So many businesses have relied on Google to drive their business model so there is a lot of money at stake.

Over time you will build up quite a list of sites but to get you started there’s a great list on jongales.com of known content farms and spam sites. The list has been updated a few times and also links to a Google search for the site so it’s easy then to add the site to your own blocklist.

It’s extensions like Personal Blocklist that have made me switch to Chrome as my primary browser. Fast and stable and doesn’t chew up every available bit of ram unlike Safari.

Instant Heart Rate

When I first saw this app I dismissed it as a gimmick. Some of the reviews on the app store said as much – rubbish, it doesn’t work, con artist – blah, blah, blah. Thanks to Shakeel though I downloaded the app for my iPhone and what do you know – it works!

Instant Heart Rate for iPhone (and also Android devices) is a £0.59 app that measures your heart rate. It does this via the iphone’s camera – thats the bit that initially put me off the app. How would the camera detect heart rate? Well, by enabling the flash the camera can detect your heartbeat by the colour variation as the blood flows through your fingers. Fire up the application, click on measure and the flash is enabled. Place your finger over the camera lens and wait a few seconds for the app to settle and start detecting. It will then measure for a few seconds and start displaying your heartbeat. Once measuring accurately you can then store your heartbeat and a simple graph over time will show your measurements. The hastily shot video below shows how quickly it measures your heart rate.

I was still a bit sceptical but a few other tests after badminton and cycling confirmed it’s accuracy, tying up exactly with the heart rate monitor on my bike. As well as measuring heart rates, the app will also measure your heart rate recovery. The app will measure your rate for 60 seconds after exercise and this can be used as a simple measure of how fit your heart is. Again the app will chart your heart rate recovery over time so if you’ve made a New Years resolution and fitness is a new goal this should give you a way of measuring progress over the year.

Couple of updates from after the podcast. The app doesn’t work on the iPhone 3G but does on the 3GS although it needs a lot of light to accurately detect your heartbeat. Secondly, the app is also available for Android devices but I’m not sure on pricing or which devices are supported.

A very simple app but great value for £0.59 and definitely an app that impresses people when they see it in action.

Alfred for Mac

Alfred for Mac has been available for nearly a year but I only recently tried it via the Mac App Store. It’s a productivity tool in the mould of the much loved Quicksilver and more recently Launchbar. Alfred can be used to quickly launch any application, find documents on your computer or quickly launch web shortcuts plus a whole lot more.

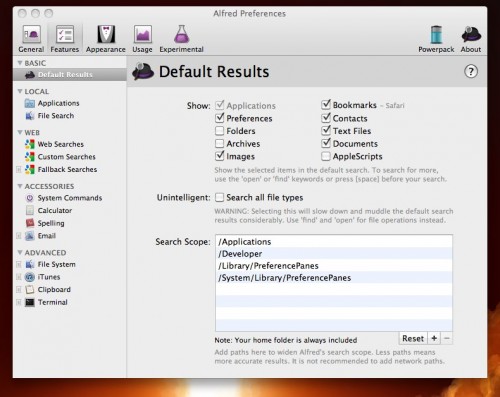
Alfred is still called a beta but it’s been rock solid so far in my usage. Downloading the free version from the App Store brings with it a host of functionality. Alfred is called via a keyboard shortcut which can be chosen by the user. I always use cmd+space for my launcher applications. So typing cmd+space opens the Alfred window and from there I can search for applications and files on my local machine or on the web. For example, type 1p and Alfred will start to list files matching the text 1p. As I’ve launched 1Password before, Alfred will present that as my favourite result.

If I don’t want to launch 1Password I can tap down through the returned results via he arrow keys or I can use cmd+number to open another file, contact etc. This allows for very quick searching and launching of applications and files. On a file or contact returned in Alfred I can press the right arrow key to conduct a series of actions – launch file, mail file, delete file etc. Alfred will never replace the finder for me but for seeking out a file to edit or mail on to a friend it’s far quicker than the default Mac tools. The free tool also comes with a calculator and spell checker as well as a variety of built in web searches. Type google searchterm and a Google search will be run for the given searchterm, opening in a new tab in your default browser. Custom searches can also be added so it’s easy to add a shortcut for Bing Images for example. As a free tool it’s great but there’s also a paid option for Alfred – the Alfred Powerpack.

The powerpack isn’t available via the App store as in app purchasing isn’t supported yet. Instead, buy the powerpack from the Alfred website for £12 and you unlock a far more feature rich tool. Fallback searching (if nothing is found then search via Google) is added plus the ability to e-mail form Alfred. However the bigger additions are iTunes and Clipboard extensions.

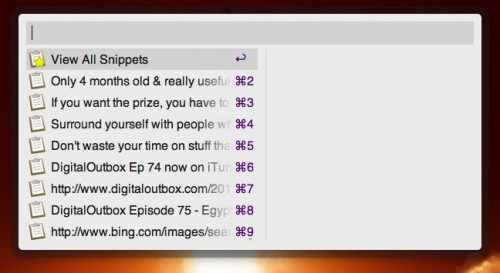
An iTunes mini player allows you to search and control iTunes not only selecting music and the usual play/pause controls but also rate music as well. A more useful feature is Clipboard History and Snippets. Launched via a separate shortcut or by typing snip within Alfred, the snippets extension will show you your clipboard history allowing you to easily copy old clipboard entries to application. Snippets allow you to setup a library of snippets for commonly entered text. I find that really useful for the podcast – I have path entries, twitter text, iTunes boilerplate text entered as snippets so I can paste them in when required.

Alfred is not only a very functional app but looks good with it as well. The original Quicksilver always looked great and although Launchbar is functionally more rich that both Quicksilver and Alfred, I find the performance of Alfred coupled with the better design to be much better (might be due to size of Launchbar index over time). If you already have Launchbar then the extra cost of paying for Alfred can’t be justified but if you’ve not tried a keyboard driven launcher before then fire up the App Store and try the free version of Alfred. I’m pretty confident that after a few days you’ll be paying for the powerpack version as the time saved over a few weeks is worth far more than £12.